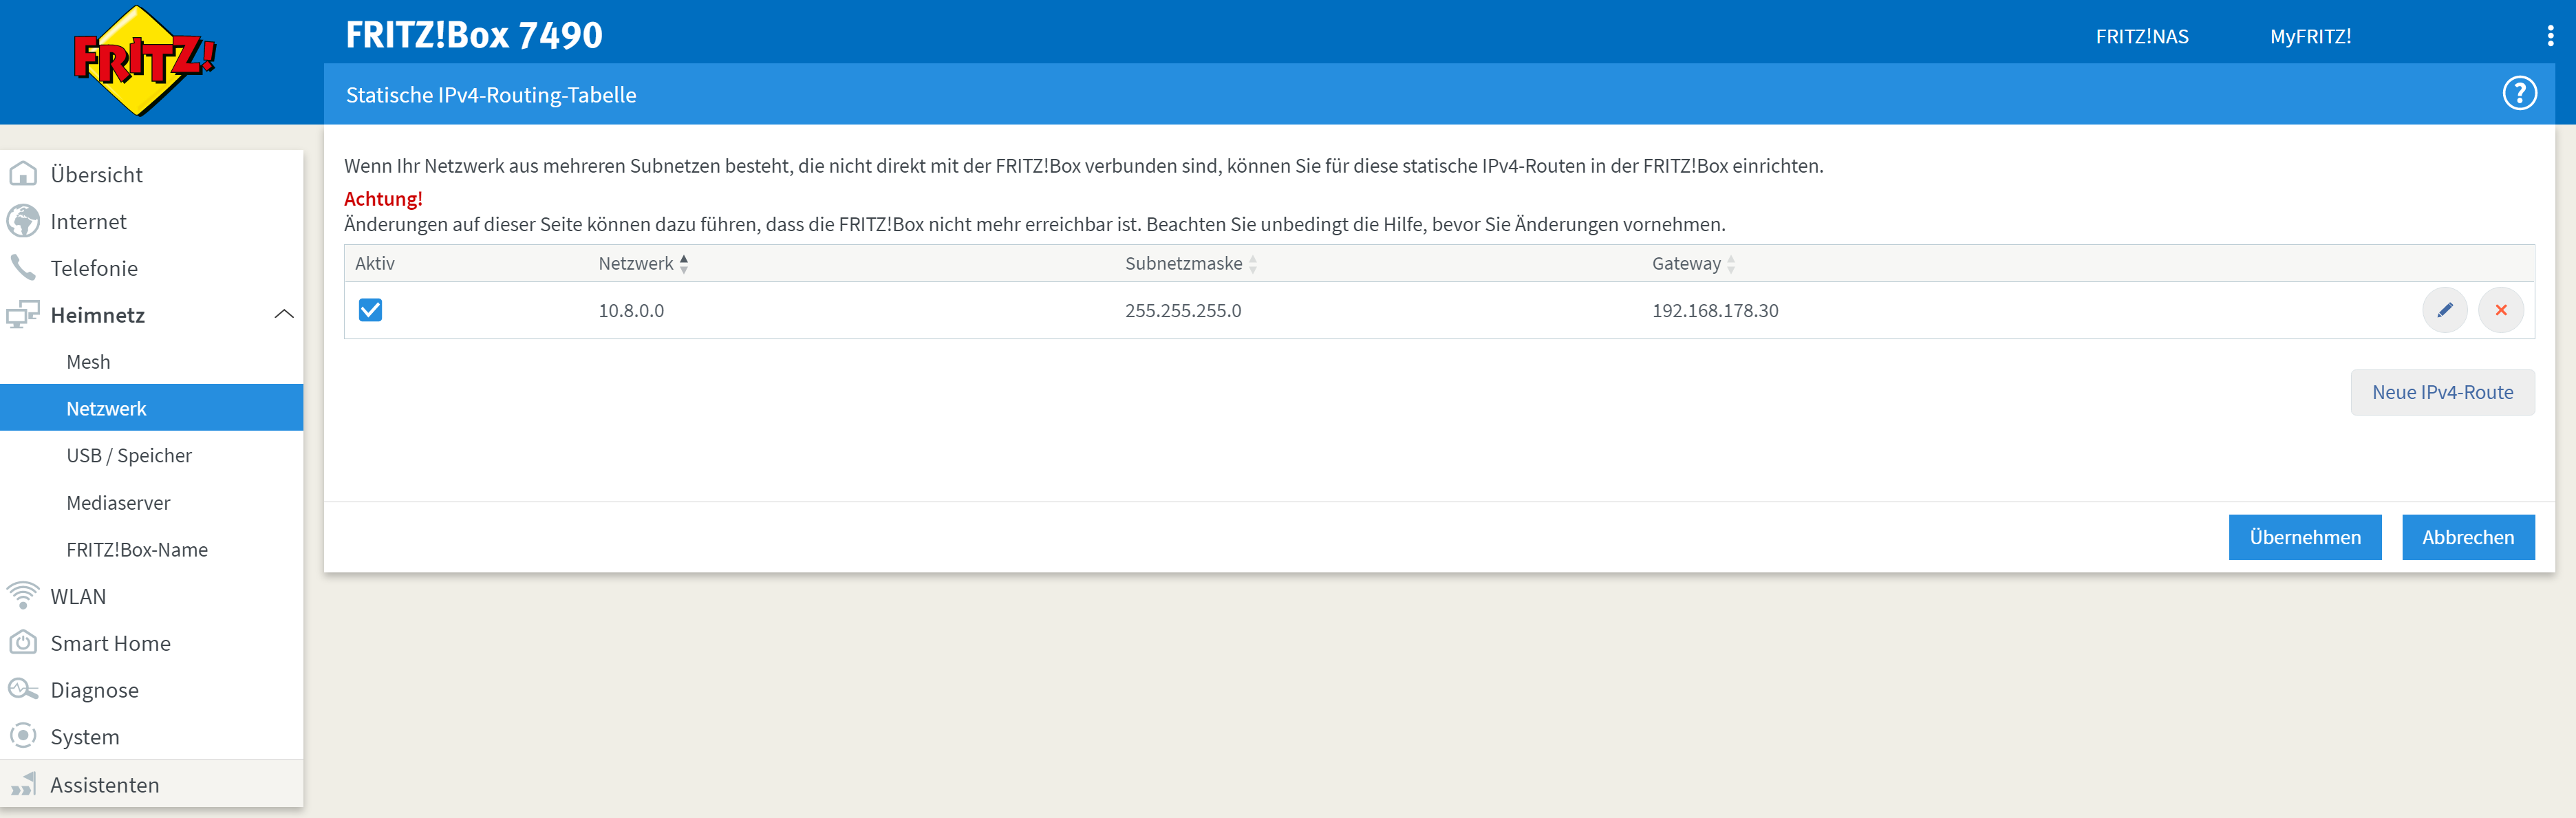
How to reach Teltonikas RUTX11 Webinterface thru the OpenVPN Tunnel

This is a follow up from the previous article “Setup OpenVPN Connection to Synology using Teltonika RUTX11“.

We have now the OpenVPN connection running connecting the Synology OpenVPN server over the mobile network to the Teltonika RUTX11. However you will notice that once you enter the IP address of your Teltonika device as seen on your VPN Server for this connection (in my case 10.8.0.6) , its not yet working.

Step 1. Add a static route to your Router

In most case the Home Network will use another IP range than the OpenVPN server is giving to the clients. Therefore we need to tell our Home Router the way to this network. In my case its a FritzBox but it works similiar on other routers.

Add a new static route on Home Network -> Network -> Network Settings -> Static Routing Table -> New IP4 Route

Step 2. Modify the Firewall at the Teltonika RUTX11

On your Teltonika Router open Network -> Firewall -> Traffic Rules and enable “allow-openvpn-traffic” rule.

Now you should be able to open the Teltonika management website using the IP address assigned from OpenVPN.

Did this help you or do you have a question? Let me know at the comments.

Setup OpenVPN Connection to Synology using Teltonika RUTX11

I recently bought this router for the Camper Van to have a good connectivity while on the road. I want to use OpenVPN to remote control the Teltonika device while operating on a mobile network. Usually a fixed IP is needed on the SIM card which is inconvenient to get.

I configured the OpenVPN connection using the exported configuration but it never established a connection. I also noticed that I won’t ask for username/password but this is required to connect to Synology’s OpenVPN server.

The support documents at the Teltonika website didn’t really fit to my situation with Synology.

This instructions are written for the RUTX11 but should be usable on other Teltonika models as well.

1.Identifying the issue

To read the logfile on the Teltonika router I opened System -> Administration -> Troubleshoot -> Show (System Log)

One line caught my eye:

daemon.err openvpn(Test)[3644]: neither stdin nor stderr are a tty device and you have neither a controlling tty nor systemd – can’t ask for ‘Enter Auth Username:’. If you used –daemon, you need to use –askpass to make passphrase-protected keys work, and you can not use –auth-nocache.

The issue identified

So the issue is that Username/Password is required for Synology OpenVPN but the Teltonika expects a certificate based authentication.

2. Solution

Its quite simple to fix.

  1. Connect with WinSCP to the Teltonika Router. I had to change the Transfer protocol to SCP to make the connection working. Then open /etc/openvpn/ and create a new file “userpass”. Place the username required to connect to the Synology OpnVPN server at the first line and the password on the second line. Save the file.
  2. Open the VPNConfig.ovpn file from the Synology OpenVPN configuration export and change:
    • “auth-user-pass” to “auth-user-pass /etc/openvpn/userpass”
  3. Now import the VPNConfig.ovpn at your Teltonika Router on Services-> VPN-> OpenVPN-> Add
    • Specify Role to be “Client”
    • On the Main Settings page
      • Enable -> On
      • External Services -> Off
      • OpenVPN configuration file -> Select the previously modified VPNConfig.ovpn file
      • Upload OpenVPN authentication files -> Off

Voila. Enjoy your OpenVPN connection!

If you like this guide or have questions, please leave a comment. There is a follow up article “How to reach Teltonikas RUTX11 Webinterface thru the OpenVPN Tunnel“.


Remark (Not needed for the above issue but may be helpful for some users): My Synology is reachable from Internet using a certain DNS name. Therefore I need to include the DNS name at VPNConfig.ovpn on the line starting with “remote…”

remote YOUR_Synology_DNS_Name 1194

All services in Synology DSM 7.0

ServiceDescription
avahi.serviceAvahi daemon     
crond.servicePeriodic Command Scheduler    
dbus-session.serviceD-Bus Session Message Bus   
dbus-system.serviceD-Bus System Message Bus   
dhclient@ovs_eth0.serviceovs_eth0 DHCP Client    
findhostd.servicefindhost daemon     
ftpd.serviceFTP Daemon     
hotplugd.servicedaemon for handle hotplug event  
ip-conflict-detect.serviceSet IP Conflict Detect   
irqbalance.serviceService for irq balance   
nginx.serviceNginx      
ntpd.serviceNetwork Time Service    
pgsql.servicePostgreSQL database server    
pkg-ActiveBackup-agent-authd.serviceActive Backup Agent Authd   
pkg-ActiveBackup-agent-restored.serviceActive Backup Agent Restore Service  
pkg-ActiveBackup-agent-server.serviceActive Backup Agent Server   
pkg-ActiveBackup-agentless-server.serviceActive Backup Agentless Server   
pkg-ActiveBackup-apid.serviceActiveBackup for Business apid   
pkg-ActiveBackup-dsmcached.serviceActive Backup DSM Cache Daemon  
pkg-ActiveBackup-fused.serviceActive Backup Fuse Daemon   
pkg-ActiveBackup-hypervisor-server.serviceActive Backup vSphere Server Daemon  
pkg-ActiveBackup-job-queued.serviceActive Backup Job Queue Daemon  
pkg-ActiveBackup-lo-server.serviceActive Backup Lo Server   
pkg-ActiveBackup-logd.serviceActive Backup Log Server   
pkg-ActiveBackup-privileged.serviceActive Backup Privilege Action Service  
pkg-ActiveBackup-proxyd.serviceActive Backup Proxy Service   
pkg-ActiveBackup-retention.serviceActive Backup Rotation Daemon   
pkg-ActiveBackup-synodedup-engined.serviceSynology Version Dedup Engine daemon  
pkg-apache24.serviceApache2.4 daemon     
pkg-Docker-dockerd.serviceDocker Application Container Engine   
pkg-Docker-termd.serviceDaemon for container terminal session  
pkg-etcd.servicestart etcd     
pkg-FileStation-thumbd.serviceFileStation Thumbnail Daemon      
pkg-libvirtd.servicelibvirt daemon     
pkg-ReplicationService-synobtrfsreplicad.serviceReplication Service Daemon    
pkg-scsi-plugin-server.serviceSAN Plugin Server    
pkg-scsit-monitor.serviceSCSI Target Monitor    
pkg-syno-etcd-logd.serviceetcd log daemon    
pkg-synocccd.servicesynoccc daemon     
pkg-synocccstated.servicesynoccc state daemon    
pkg-SynoFinder-fileindexd.servicepkg-SynoFinder-fileindexd      
pkg-SynoFinder-synoelasticd.servicepkg-SynoFinder-synoelasticd      
pkg-synohostcmdd.serviceSynology host command handle daemon  
pkg-synohostcommd.serviceSynology host communication daemon   
pkg-synohostsvcd.serviceSynology host service daemon   
pkg-SynologyApplicationService-notification_send.serviceSynology Application Service notification send daemon 
pkg-SynologyApplicationService-pgbouncer.serviceSynology Application Service pgbouncer   
pkg-SynologyApplicationService-session_watcher.serviceSynology Application Service session watcher daemon 
pkg-SynologyApplicationService-VapidSendServer.serviceSynology Application Service vapid send daemon 
pkg-synologydrive-apid.serviceSynology Drive apid    
pkg-synologydrive-authd.serviceSynology Drive authd    
pkg-synologydrive-clientd.serviceSynology Drive clientd    
pkg-synologydrive-redis.serviceSynology Drive redis    
pkg-synologydrive-syncd.serviceSynology Drive syncd    
pkg-synologydrive-vmtouchd.serviceSynology Drive vmtouchd    
pkg-synologydrive-workerd.serviceSynology Drive workerd    
pkg-SynologyPhotos-apid.serviceSynologyPhotos apid     
pkg-SynologyPhotos-bg-jobd.serviceSynologyPhotos Background Jobs    
pkg-SynologyPhotos-check-album.serviceSynologyPhotos Check Album Service   
pkg-SynologyPhotos-check-center.serviceSynologyPhotos User Check    
pkg-SynologyPhotos-face-extraction.serviceSynologyPhotos face-extraction     
pkg-SynologyPhotos-geocoding.serviceSynologyPhotos Geocoding     
pkg-SynologyPhotos-notify-center.serviceSynologyPhotos Synotify Daemon      
pkg-SynologyPhotos-person-clustering.serviceSynologyPhotos person-clustering     
pkg-SynologyPhotos-pgbouncer.serviceSynologyPhotos PgBouncer     
pkg-SynologyPhotos-task-center.serviceSynologyPhotos Task center      
pkg-SynologyPhotos-thumb.serviceSynologyPhotos Thumb     
pkg-SynologyPhotos-thumbnail-provider.serviceSynologyPhotos Thumbnail Provider    
pkg-synosamba-nmbd.serviceNetBIOS name server    
pkg-synosamba-smbd.serviceSamba SMB Daemon    
pkg-synosamba-wsdiscoveryd.serviceWS-Discovery Server     
pkg-synosamba-wstransferd.serviceWS-Transfer Server     
pkg-synovncrelayd.servicestart synovncrelayd     
pkg-tcmu-runner.serviceLIO Userspace-passthrough daemon(tcmu-runner)    
pkg-VPNCenter-openvpn-server.serviceOpenVPN server of VPN Server package 
pkg-VPNCenter-vpnauthd.serviceRadius daemon of VPN Server package 
pkg-WebStation-fcgiwrap.serviceWebStation fcgiWrap daemon    
pkg-WebStation-php70@9f1e642a-0d20-4664-8934-c51d34f609de.serviceWebStation PHP7.0 fpm process   
pkg-WebStation-php72@f5aced07-eaae-4fba-a28e-1e49f6bee51e.serviceWebStation PHP7.2 fpm process   
pkg-WebStation-php73@60557a02-0d3c-489c-85e5-c05685bbb3cb.serviceWebStation PHP7.3 fpm process   
pkg-WebStation-php74@84cd762d-3d8e-4439-bd82-481185e8e02b.serviceWebStation PHP7.4 fpm process   
s2s_daemon.serviceShared Folder Sync Daemon   
scemd.servicedaemon for monitor HW/system status  
serial-getty@ttyS2.serviceSerial Getty on ttyS2   
snmpd.serviceSNMP Daemon     
ssdp.serviceSSDP service     
sshd.serviceOpenBSD Secure Shell server   
syno_disk_latency_monitor.serviceSynology daemon for monitoring disk latency. 
synoagentregisterd.servicesynoagentregister daemon     
synobackupd.servicesynobackup daemon     
synocgid.serviceSynology CGI Auth Daemon   
synoconfd.servicesynoconfd daemon     
synocontentextractd.servicesynoce daemon     
synocrond.serviceSynology Cron Daemon    
synodbudd.serviceSynology Database Update Daemon   
synoindex-mediad.servicesynoindex mediad     
synoindex-notifyd.servicesynoindex notifyd     
synoindex-plugind.servicesynoindex plugind     
synoindex-scand.servicesynoindex scand     
synoindex-workerd.servicesynoindex workerd     
synoindexd.servicesynoindexd      
synologand.servicedaemon for monitor logs and generate alert
synologrotated.serviceLog Rotate Daemon    
synomkflvd.servicesynomkflvd      
synomkthumbd.servicesynomkthumbd      
synonetd.serviceSynology Network Daemon    
synoneteventd.serviceSynology Network Event Daemon   
synoovs-db.serviceOpen vSwitch database server   
synoovs-vswitch.serviceOpen vSwitch deamon    
synoperfeventd.serviceDaemon of performance alarm   
synoscgi-socket.serviceSynology SCGI SocketIO    
synoscgi.serviceSynology SCGI     
synoscheduled-vmtouch.serviceSynology Task Scheduler Vmtouch   
synoscheduled.serviceSynology Schedule Daemon    
synoscheduler-vmtouch.serviceSynology Task Scheduler Vmtouch   
synosnmpcd.serviceDaemon for Resource Monitor   
synostoraged.serviceSynology daemon for monitoring space/disk/cache status 
synotifyd.servicesynotifyd      
syslog-acc.serviceSynology log accounting service   
syslog-ng.serviceSystem Logger Daemon    
systemd-journald.serviceJournal Service     
systemd-logind.serviceLogin Service     
systemd-udevd.serviceudev Kernel Device Manager   
systemd-journald-audit.socketJournal Audit Socket    
systemd-journald-dev-log.socketJournal Socket (/dev/log)    
systemd-journald.socketJournal Socket     
systemd-udevd-control.socketudev Control Socket    
systemd-udevd-kernel.socketudev Kernel Socket    

Opening Outlook 2016 / 365 Crashing Internet Explorer on Windows Server 2012 R2

Recently I came accros a issue on Windows Server 2012 R2. On start of Outlook I always received two error messages “Internet Explorer has stopped working”.  Tried several things to get rid of it, nothing helped. Since there is not much to find about this combination, I document it here.

Solution:

Download KB4012216 from Microsoft, install and reboot. Voila, errors gone.


How to hide all disabled Citrix XenApp applications in 7.X

While preparing a new farm, I realised that there is no GUI feature to hide a disabled application in XenApp 7.X unlike it was in 6.X.

This is causing issues for users when trying to open a disabled app. They will receive a error message “The resource you requested is no longer available from the server or you are no longer permitted to access it.” or similar.

At this time there is no option to do this from within Citrix Studio. But you can do it easily using PowerShell.

This 3 lines will hide all disabled apps at once.

asnp citrix.*
$app = Get-BrokerApplication -Enabled $false
Set-BrokerApplication -InputObject $app -Visible $false

Was this useful for you? Please leave comment.

Failed to connect to Let’s Encrypt. Please make sure your Diskstation and Router have Port 80…

I recently was annoyed by a strange error.

“Failed to connect to Let’s Encrypt. Please make sure your Diskstation and router have port 80 open to Let’s Encrypt domain validation from the Internet. All other communications with Let’s Encrypt go over HTTPS to keep your Diskstation secure.”

Synology Lets Encrypt Issue

Is was searching for port forwarding issues on port 80 and 443. But seems all correct and working. Must be something else. Finally found the root cause.

The website was reachable using www sub- domain prefix but not without.  Using mathiasirmer.com there was a not working redirection. As soon as I fixed this I was able to get the certificate from Lets Encrypt. So don’t let this error message guide you in the wrong way.

Do you see this issue and need help? Leave me a comment!


Obtain Citrix HRP version using Powershell when not displayed in Citrix AppCenter

Several of my servers do not show the HRP in the AppCenter Console. As the usual fix using to recreated the LHC did not work and I can’t reboot the servers for some weeks I wrote this Powershell OneLiner to get it directly from the list of installed programs.

Maybe its useful for somebody else.

Get-ItemProperty HKLM:\Software\Wow6432Node\Microsoft\Windows\CurrentVersion\Uninstall\* | Select-Object DisplayName | Where {$_.DisplayName -like "*Citrix Hotfix Rollup Pack*"} | select-Object -last 1  | foreach {$_.DisplayName}


Display server name in StoreFront 3

Following up this article at the Citrix forum, I’l explain how to display the Server name in StoreFront 3 in the browser. I’m doing that using a text file as a cache.  The reason for this is because I’m trying to use the  server name in the native receiver as well which works offline only (not yet working ).  

My method is based on the older GetServerData.aspx method that I modified for our needs.

Step 1: Create ‘GetServerData.aspx’ in \custom folder.  It does the following:

  • Gets  IP and server name into variables (I use only server name, format is xxx_xxx)
  • Shortens the server name to the first 2 and the last character
  • If it not exists already it writes it to text file /custom/cache/server-info.txt
  • text file is re-created every 24 hours

I’m sure the code can be better but it works for me. 


<%
// Storefront Server Data
string sData = Request["serverData"]+"";
switch (sData)
{
case "clientIP":
Response.Write(GetClientIP());
break;
case "serverName":
Response.Write(GetServerName1());
break;
case "clientIPandServerName":

Response.Write(GetServerName1() + "-" + GetServerName2());
break;
default:
break;
}

%>
<%@ Import Namespace="System.IO" %>


Step 2:  In /custom/script.js add the code below

  • It will add the server name to the login and main page of StoreFront
/* Call ASP script */
$('#customBottom').load('custom/GetServerData.aspx?serverData=clientIPandServerName');

/* Adding Server Name to Login Page */
function setDynamicContent(txtFile, element) {
CTXS.ExtensionAPI.proxyRequest({
url: "custom/cache/"+txtFile,
success: function(txt) {$(element).html(txt);}});
}
setDynamicContent("server-info.txt", '.customAuthFooter');
setDynamicContent("server-info.txt", '#customBottom');


Step 3:  Add this to  /custom/style.css

/* Footer */
#customBottom {
text-align: right;

/* This creates a half transparent bar optionally */
/*background-color:White;*/
/*opacity: 0.9;*/

background-position: 100% 100%;
color: #4D4F53;
font-size: 12px;
}
#customBottom a:link { color: #4D4F53; }
#customBottom a:visited { color: #4D4F53; }
#customBottom a:hover { color: #4D4F53; }
#customBottom a:active { color: #4D4F53; }

/* Change visibility of Auth Page mods */
.customAuthHeader,
.customAuthFooter,
.customAuthTop,
.customAuthBottom
{
font-size:14px;
color:white;
text-align: right;
}


Do a IIS restart and have a look at the right lower corner.


Native Citrix Receiver:  I'm really having a hard time to use the server-info.txt file and display it for receiver as well.  Any proposals are welcome. Please leave a comment.